Easy to make dough for pierogi1 or uszka2. Works well with KitchenAid Pasta Roller attachment but can be used with other pasta rollers or hand-rolled. It is easiest to mix the dough in a food processor first.
Recipe

Ingredients
| 350 g | All-purpose flour |
| 50 g | Butter |
| 120 mL | Boiling-hot water |
| 1 | Egg (optional)3 |
Directions
- Place 350 g of flour in a large food processor.
- Aerate the flour by pulsing the food processor several times.
- Add butter cut into ¾ – 1-inch cubes. Butter can be cold from the fridge or warmed on the countertop to almost room temperature. You can add butter in portions to avoid cubes from sticking together if warm, but really it does not matter much.
- Process flour and butter until thoroughly mixed. At this point it should look like grated parmesan cheese.
- While running the food processor, pour in 120 ml of boiling-hot water and process until the whole mass becomes lumpy.
- If desired, add one egg and continue processing until an uniform lumpy mass is formed.
- If the dough is too soft, add some flour and continue processing.
- Take the dough out and continue kneading by hand until it becomes an uniform smooth ball.
- You can do kneading in a stand mixer if you wish.
- If using a pasta roller attachment, cut pieces of the dough and pass it several times through the rollers at the highest thickness, folding the rolled-out dough in half at every pass. This can be done instead of kneading. At the end the dough should come out smooth and elastic.
- Place the kneaded dough (whether a ball or rolled-out pieces) in a plastic bag and let it rest in a fridge for at least 30 min but even as long as a day.
- The dough can also be frozen for later use, especially if you won’t use it all at once.
- When ready to make pierogies, take the dough out of the fridge and thinly roll pieces of it to be used as a “wrapper”.
- If using pasta roller, you have two options:
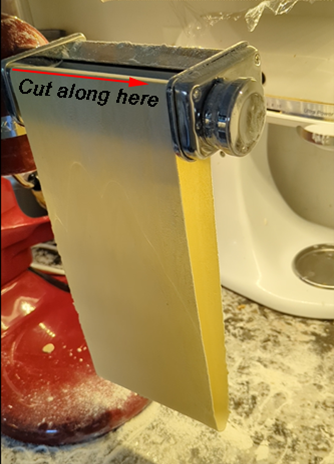
- Roll a piece of dough to make a thin sheet big enough for about ten pierogi1. Pass it through the roller starting at the thickest (setting 1), going through each step at least once until you reach setting 5. You can pass the dough through the rollers feeding it in again after every pass, but if you are skillful enough, you can roll the dough as a continuous conveyor belt by joining the two ends together when at setting one. Then gradually change the setting allowing the “belt” to be wholly rolled thinner at each step until you get the thickness needed. With a sharp knife quickly cut the belt just before where it enters the rollers, and you’ll get a nice, almost rectangular piece of thinly rolled dough. See Picture 1 and the video attached.
- Taking small pieces of dough, each just big enough for one pieróg, pass each trough the roller from thickest to thinnest. To make it efficient, take about ten pieces and roll them all through the thickest setting, then all through the next thinner, and so on until you have them all thin as desired. Rotate the pieces at each step so that they stay approximately round. Don’t prepare too many at once as they may dry out and be harder to seal.
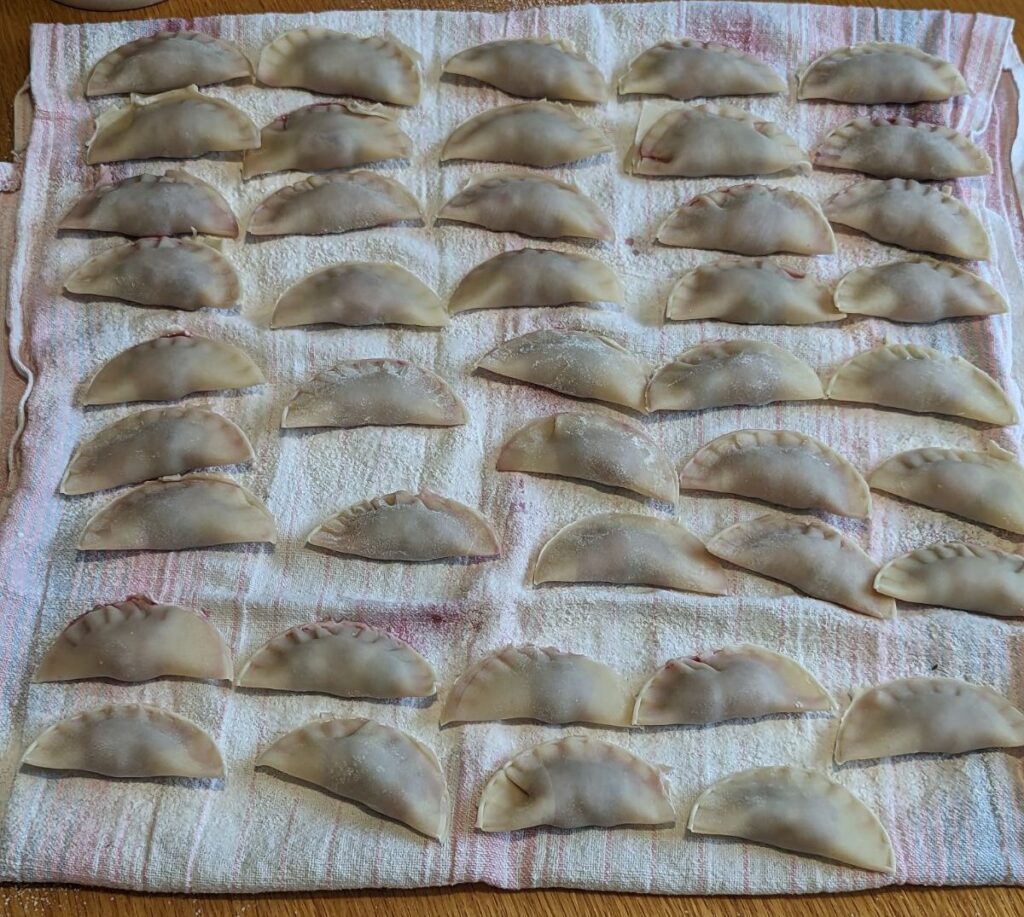
- There are many ways to make (close, seal) pierogi. There are gadgets that help you do this. If doing this by hand, it is common to start with a round piece of the rolled dough. This can be cut out of the larger sheet using a cutter or a sturdy round upside-down glass. The gadgets I use can trim excess dough from a rectangular piece of wrapper. The trimmed pieces usually become too dry to be re-rolled and used for wrapping pierogi, but can be collected, rolled thin and cut in strips for some home-made pappardelle, tagliatelle, or if you have another gadget – pasta cutter – even spaghettini. You can even cook those in the same water after you are done cooking pierogi.
Hint: I use a water spray bottle (culinary use only) to mist the wrappers very lightly before dosing the filling in the centers of them; This makes the wrappers more sticky and easier to seal. - Pierogi can be filled with various fillings including:
- Meat, best mixed with vegetables,
- Potatoes with fried onion, bacon, or cheese, etc.,
- Sour cherries, blueberries, and some fruits,
- Cheese, quark variety,
- Sauerkraut, possibly with mushrooms and fried onions,
- Mushrooms and fried onions, particularly made with dried Bolete mushrooms (Porcini).
- Recipes for those exceed the scope of this recipe, but I hope to post them separately at some point.
- Cook pierogi by adding them into ample amount of boiling salted water (use less salt with sweet fillings). Cooking time: about 3-4 minutes after pierogi float or after the water restarts boiling; lower the heat once it boils again to minimize risk of pierogi bursting openNo.
Home made pasta needs only 2 minutes cooking time.

Footnotes
- Pierogi in Polish is already plural, hence pierogies would be an equivalent to something like womens, sheeps, or childrens. Grrr… A single one is “pieróg”, pronounced /ˈpjɛ.rug/. ↩︎
- Uszka /ˈuʂ.ka/ plural, singular+ uszko – Polish version of tortellini, are just very small pierogi, the tips of which were pinched together. Use the same dough. ↩︎
- There is often a discussion whether the dough for pierogi should include eggs. People argue that adding eggs makes the dough less elastic. For the amount of flour in this recipe, I add or not one egg on a whim, but did not notice a significant difference. I wouldn’t add more, unless the dough was meant for linguini or such, not for pierogi. Almost everybody agrees however that using boiling water is crucial. The dough being prepared will be warm, but not hot enough to change the added egg. ↩︎
To view the video of rolling the dough on the pasta roller attachment, click on the link below and be patient – it may be slow to load
Pingback: Meat Filling (Farsz Mięsny) for Pierogi – madscientistchef.com